An on-grid solar inverter is your bridge to clean energy. It connects your solar panels to the main power grid, converting the sun’s power into electricity your home can use. Now, installing it might sound technical, but with the right steps, it’s a breeze. You’ll choose a location, mount the inverter, make connections, and voilà, you’re harnessing the sun! If you’re eager to know about solar energy and understand the installation process, you’re in the right place. Let’s embark on this sunny journey together!
What is a on-grid solar inverter?
An on-grid solar inverter plays a vital role in your solar setup. It connects your solar panels to the main power grid. Here’s how it works: Your solar panels generate direct current (DC) power. The power in our houses, however, is AC. The on-grid solar inverter comes in, converting that DC power to AC. The beauty of being on-grid? When your panels produce more power than you need, you can send that excess back to the grid. Sometimes, this even earns you credits on your electricity bill! So, this little device not only powers your home but also makes sure no energy goes to waste.
Difference betewin offgrid vs ongrid inverter
If you’re exploring solar energy, you’ve likely come across the terms “off-grid” and “on-grid” inverters. Both have their own special advantages, but which is best for you? Let’s break down their differences in a simple, friendly manner.
Connection to the Grid
Right there in their names is the main distinction. On-grid inverters connect to your local electricity grid, while off-grid inverters do not. Think of on-grid systems as team players, working with the grid to ensure power supply. Off-grid systems, on the other hand, prefer to work solo, relying solely on the energy they produce.
Energy Storage and Usage
With an on-grid inverter, when your solar panels produce more energy than you can use, that excess energy goes back to the grid. Some places even offer credits on your bill for this, called ‘net metering’. It’s a way to balance out your energy use and production. Off-grid inverters don’t have this luxury. Instead, they store excess energy in batteries for later use. This means you’ll need a good storage solution if you go off-grid.
Backup during Outages
Here’s a surprising fact: if there’s a power outage, homes with on-grid systems might be left in the dark too. Why? For safety reasons, these systems often shut down to prevent sending power back to the grid during repairs. Off-grid systems don’t have this problem. Since they operate independently, they can continue providing power, as long as there’s stored energy in the batteries.
Initial Cost and Maintenance
On-grid inverters usually have a lower initial cost than off-grid ones. They don’t require big battery banks, which can be pricey. But off-grid systems give you full control over your energy. You don’t rely on the grid, which can be advantageous in areas with frequent power outages or unstable electricity supply. However, remember that batteries need replacement after some years, so factor in those long-term costs.
Flexibility and Scalability
On-grid systems offer flexibility. If your energy needs increase, you can always draw from the grid. Off-grid systems need careful planning. If your energy consumption grows, you might need more panels or larger batteries. But they’re perfect for remote locations where connecting to the grid is challenging or too expensive.
Environmental Impact
Both systems harness clean, renewable energy. However, with on-grid systems, if you’re not producing enough solar power, you might be drawing electricity generated from fossil fuels, depending on your local grid. Off-grid systems rely purely on the sun, so as long as you have enough storage, you’re running on 100% green energy.
Long-Term Benefits
On-grid systems can be beneficial in areas with supportive net metering policies. Over time, feeding excess power back can lead to significant savings. Off-grid systems offer energy independence. Once set up, you’re shielded from rising electricity prices, giving you more control over your energy finances.
Your choice between on-grid and off-grid inverters depends on your individual needs and circumstances. If you’re in an area with a stable grid and favorable net metering policies, on-grid might be the way to go. If you’re seeking energy independence, or you’re in a remote location, off-grid could be your best bet.
How to install a on grid solar inverter?
If you’ve chosen to go with an on-grid system, you’re making a great choice for both the environment and potentially your pocket. Installing an on-grid solar inverter might seem daunting, but with the right steps and safety precautions, it can be a smooth process. Here’s a friendly guide to help you understand how to install an on-grid solar inverter.
1. Understand Your Energy Needs
Before you start, know your energy requirements. Examine your power statement or get in touch with your utility company. This will help determine the size of the inverter and panels you’ll need.
2. Choose the Right Location
Find a suitable place for your inverter, preferably close to the main supply. It should be in a well-ventilated area, away from direct sunlight and moisture. This ensures it doesn’t overheat and runs efficiently.
3. Gather Necessary Tools and Equipment
You’ll need various tools like a drill, wrenches, screwdrivers, and safety gear (gloves, safety glasses, and more). In order to prevent disruptions, make sure you have everything.
4. Mount the Inverter
Follow the manufacturer’s instructions for mounting. Most inverters have a mounting bracket. Fix this bracket to your chosen spot, ensuring it’s level, and then mount the inverter onto it.
5. Grounding the Inverter
Grounding is crucial for safety. Connect the inverter’s grounding terminal to a proper earth pit, using a suitable gauge wire.
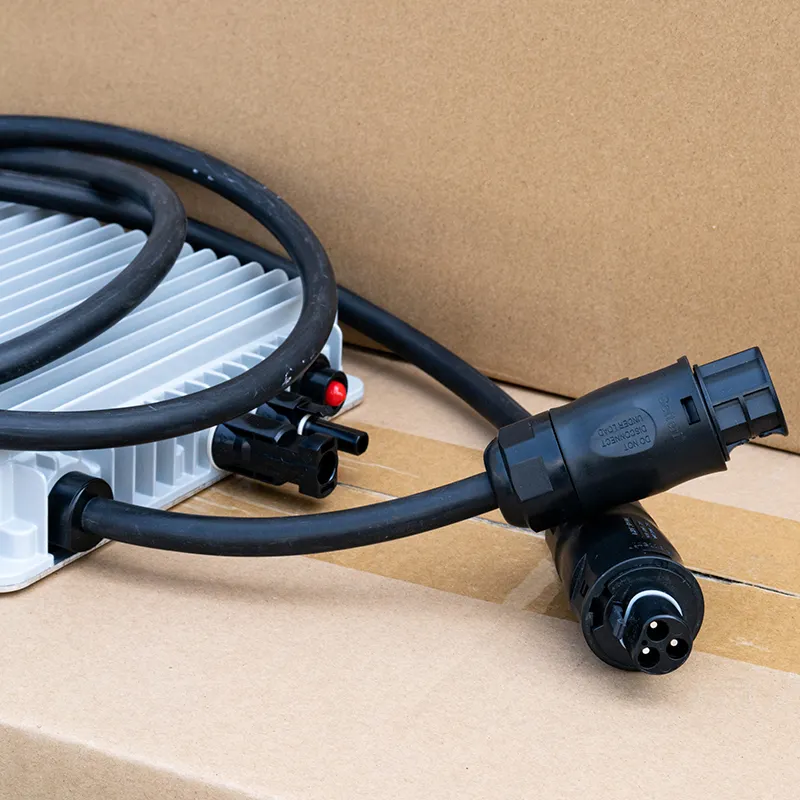
6. Connect to the Solar Panels
Solar panels generate Direct Current (DC). Your inverter will convert this DC into an Alternating Current (AC) for home use. Connect the DC output from your solar panels to the DC input of your inverter. Always ensure correct polarity when making these connections.
7. Wire to the Main Supply
This is the part where the inverter sends converted AC to your home. Use the appropriate AC wires and connect them from the inverter’s output to your home’s main supply. It’s often done through a junction box.
8. Install Safety Fuses
Safety first! Install appropriate fuses on both the DC and AC sides of the inverter. This will protect your system from any unexpected surges or short circuits.
9. Connect to the Grid
Before you do this, inform your electricity provider about your on-grid system. Some require approval or inspections before you can connect. Once you get the go-ahead, connect the inverter to your electricity grid. This typically involves tying into a breaker in your main electrical panel.
10. Test the System
Before fully powering on, double-check all connections. Once you’re confident everything is secure, switch on the inverter. Monitor the indicators; most inverters will have lights or displays showing they’re working correctly.
11. Monitor and Enjoy
Many modern inverters come with monitoring systems. They let you see how much energy you’re producing and consuming. It’s a great way to track your solar energy usage and understand your savings!
12. Regular Maintenance
While not part of the installation process, regular maintenance ensures your inverter runs smoothly for years. Clean the area around it, check for loose connections, and monitor its efficiency.
A Few Important Tips
Safety First: Always turn off the main electricity supply before starting the installation to avoid electric shocks. Also, never work on a wet or damp surface.
Professional Help: If you’re unsure about any step or feel overwhelmed, consider hiring a professional. They have the expertise and can ensure the installation is safe and efficient.
Local Regulations: Always be aware of local regulations and permissions. Some areas have specific guidelines or require permits for solar installations.
Warranty and Support: Ensure you register your product if required and keep a note of the warranty period. It’s also good to have the support numbers handy in case of any queries or issues.
In Wrapping Up
Installing an on-grid solar inverter is an empowering step towards sustainability and energy independence. While the process involves several steps, breaking them down and following them methodically makes it manageable. Always prioritize safety and don’t hesitate to seek professional help if needed.